![]()
STOP !
We Can Decode This Radio Via E-Mail !
Clarion PT-9662 Finish Line 540

The Security Code number on this model is determined via a series of soldered links on the bottom of the
main circuit board, and if you can inform us of the sequence of soldered links, we can calculate the
Security Code number for you. If for any reason we get the code number wrong, then we will require the
unit back here at our workshop to be reset and recoded, which will incur an additional charge on top of
what has already been spent. But so far, this method has proved 99% successfull, if you follow our
very simple steps below.
A large amount of disassembly is required, and will require some practical skills. The following steps
are shown purely as a guideline, and if you are unsure about performing this disassembly, then please
contact us for a quote to do it for you. But before you start to panic, if you have managed to get the
radio out of the vehicle, then some of the hard work may have already been done!!
Step 1 :
Pull Off the Two Large Knobs on the front and the two sleeved knobs behind them. Next remove the top lid.
This can be removed by gently inserting and twisting a screwdriver on the side lugs.
Step 2 :
Remove the Four screws underneath holding the cassette deck.

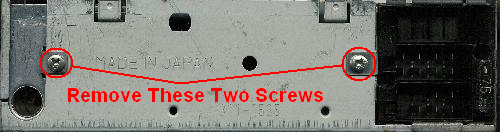
Step 3 :
Remove the Two screws at the rear of the unit.
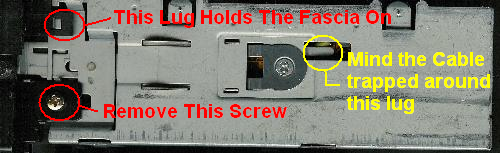
Step 4 :
Remove the screw on the Right Hand side that holds the handle on. The Clip that holds the fascia is also
shown. In the picture , there is a small lug shown that is bent around a cable inside the unit. Be carefull
to release this cable as the cassette deck is removed.
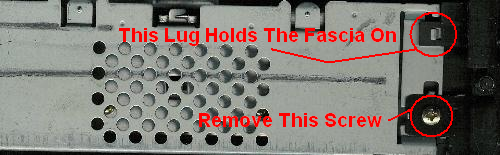
Step 5 :
Remove the screw on the Left Hand side that holds the handle on. The Clip that holds the fascia is also
shown. The handle will now come off. With gentle pressure on the two lugs on the sides, the fascia can now
be removed. There will be slight resistance at the lover edge of the fascia due to another internal lug, but
if the fascia is gently twisted downwards, it will be easily removed.
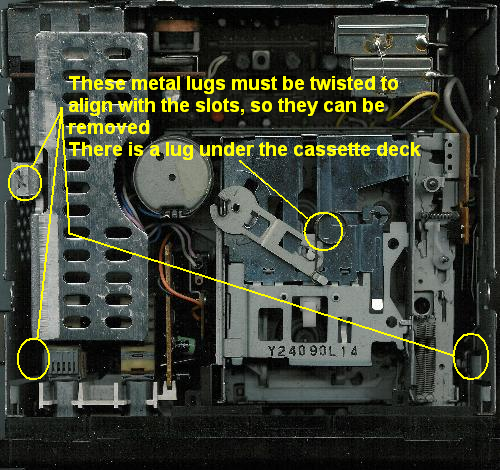
Step 6 :
There are four metal lugs that are twisted into position after passing through a small slot. The lugs
must be located and twisted back, so that the board may pass over them. There is a lug underneath the cassette
deck, and this can be gently lifted upwards to gain access to it.
Step 7 :
Once the lugs have been bent accordingly, gently lift out the main circuit board, complete with cassette
deck attatched. Be very carefull of the cassette deck cable on the right hand side of the unit and take
care not to force or bend the main circuit board as it will fracture very easily. Once out, carefully turn
the whole unit upside down with the fascia towards you. You are looking for a series of ten solder pads
in the front left of the board as shown in the picture below.

Each pad is made up of two parts, and will look roughly like these shown below. Some will have a blob of solder linking the two parts together, and its these blobs and their locations that we need to identify.
If you assume an open, unsoldered link to be a 'Zero 0' and a blob, or soldered link to be a 'One 1', then with the fascia towards you, and reading the links left to right, you will end up with a ten digit code made up of 0`s and 1`s. For instance this series of links would give a code of 1011001011
By now you should be able to work out your own ten digit number from your own series of links. Write this
number down carefully, as we will need this to supply you with a Security Code.
If you go back to the main Decoding page for this radio, you can now order a decode by pressing the
'Add to Cart' button on the appropriate page. Follow the checkout procedure as normal, and when you have paid
for the Decode, there will be an order number shown at the top left of your final page. Now send us an E-mail
quoting the order number, your radio model number and your ten digit number you have just read, and we will
then calculate your four digit Security Code number and E-Mail it back to you.
Once you have reassembled your radio, and put it back into the vehicle, you are ready to reset the penalty
timer, and its my guess that when you switch you stereo on, you will see four numbers on the screen and no
matter what you press, they still keep showing! This stereo is codelocked!! I`m now going to divulge a little
trick of the trade, but do not do this more than once! With the unit switched on, press and hold the 'BAND'
button for around 10 seconds, and the display should dissappear completely and leave you with a blank screen. If
it does, then you are now ready to enter the code, if not, then you will have to leave the unit powered on for
at least two and a half hours for the penalty timer to expire, and then try pressing the 'BAND' button and see what
happens. If it still doesn`t clear, send me an E-Mail!
To enter your code number follow the procedure shown on the following link below for this stereo.